


When using the module Trade functionality (module number 75) the default header and footertexts are composed on the basis of textblocks. The textblocks must first be entered in the basic information before these can be used for composing the header and footertexts.
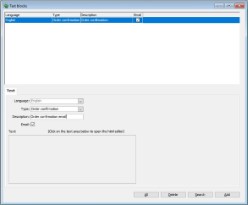
Open the menu File -> Basic information -> Texts -> Maintain textblocks. As a default, an empty window is shown. Click on [All] to show all already entered textblocks.
Click on [Add] to add a new textblock.
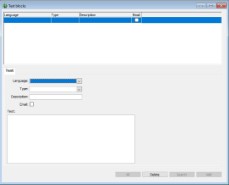


A textblock contains the following information:
|
Language |
Select with the dropdown list one of the languages. The languages to use must be entered in the Basic information. Read for adding new languages the manual Languages. | * | ||
| Type |
With the help of a dropdown list one of the available types of textblocks can be selected. The available types of textblocks are strongly dependent on the used module composition. By connecting a textblock to a certain type, the textblock can only be used in the selected type of document. Exception for this is the type 'General'. This type of textblock can be used for all header and footertexts. This type of textblock can be used for textblocks that for example need to be used for a sales order as well as for a delivery list. An example of a general textblock is: "Best regards, Company name". |
** | ||
| Description | Insert a short and clear description of the textblock here. When composing the header and footertexts only this description is visible. | |||
| Text |
Insert the text of the textblock here. The text can only be entered as 'flat' text, so with capital and small letters. Formatting of the text (bold, italics or underlined) is not possible.
|
*** | ||
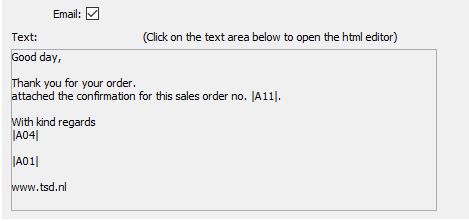
| Check box Email | Put a tick here if the text block has to be used for email messages. | **** |
*) This field is only available if the module Foreign Trade (module number 84) is activated.
**) See paragraph 'Types of textblocks' for an overview of all available types of textblocks.
***) Texts
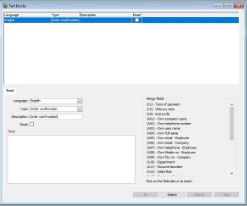
After the language and the type has been selected, an overview is shown with all available merge fields. Header- footer and email texts can make use of these merge fields. By using these merge fields in the text, then during the printing of the text the merge field will be replaced by the correct text. The merge field |A01| will when printing be replaced by the own company name. A merge field can easily be added to the text by clicking on the merge field in the list. The field will be added to the text at the place of the cursor. It is also possible to type the code of the merge field. The punctuation mark | where the number is in between can be found above the <<Enter>> button.
The available merge fields are differing per document. The description of the merge field gives enough clarity about this. The merge field Document number (code can differ per document type) can be used to include the number of for example the sales order or delivery in the text. See also paragraph ||-codes.
****) Check box Email
For a text block that has to be used in the email message, then the check box Email has to be ticked.
ADVICE: TSD advises to make a separate text block for an email message per document type.
After selecting the language and the type, the description of the text block will be entered. Place, before entering the text in the text block, a tick in the checkbox Email.
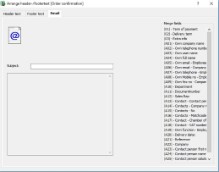
Click on the grey area to enter the default text for the email message. A separate pop-up window will be opened.
In this pop-up, the message for the email can now be entered. This text can be formatted with every desired lettertype, color and size. As with the other text blocks, also here the merge fields can be used. Next to this, images and links can be added to the email. This allows the signature that is for example used in Outlook, to also be used in sending emails from WinTree®.
NOTE: the signature from Outlook can not be pasted 1 to 1 in the WinTree® email text. The text has to be built again in WinTree®.
At the top of the pop-up window are various buttons available to format the text. Most buttons speka for themselves. With this button the font, the size, the color and the background color of the text can be altered.
 Select a text and click on this button to provide the text with a link to a webpage.
 Select this button to add an image (for example a company logo) to an email text. All image types can be used for this. Please note the size of the image, to not make the email message unnecessarily big.
An example of a formatted email message:
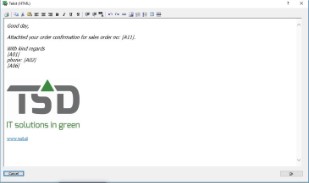
Close after entering and formatting the email message, the pop up window with [OK]. The Maintain text blocks will be shown again. In the grey area the entered email text will also be shown.
This text is however shown as ‘simple’ text. When emailing this text, the formatted text will be used. Click on the area again to view or alter the correct formatting.
After entering the textblocks, must with the help of the menu File -> Basic information -> Texts -> Header- and Footertexts the preferred textblocks be connected to the documents.
 ||-codes
For the merge fields that are available for the document Invoice applies that the merge fields |01| till |11| can only be used in the footer text. These merge fields have to make calculations which can only be done when the fields are used in the footer text.
In the footer text of the invoice there can be made use of the merge fields |01| till |11| with which information from payment terms (see Basic information -> Other) can be included in the text. When making use of these merge fields in the invoice footer text, during the printing of an invoice instead of the merge field the information of the payment term will be printed.
An example of an invoice footer text, which uses a payment term, where a customer gets a 2% discount if paid within 10 days, is:
"With a payment within 10 days, you will receive a discount of |01|% over |06| |03| = |06| |04|."
When an invoice is printed after all data has been entered, the text is: "With a payment within 10 days, you will receive a discount of 2% over £ 100,00 = £ 2,00."
For the invoice-textblock the following ||-codes are available:
| |01|, Payment discount-% | The discount percentage from the used term of payment. In case an invoice is made for which no term of payment is used, then the invoice print will show 0%. |
| |02|, Credit surcharge-% | The percentage of the credit surcharge from the used term of payment. In case an invoice is madefor which no term of payment is used, then the invoice print will show 0%. |
| |03|, Base price | With this the net plant amount is printed. |
| |04|, Payment discount amount | With this the calculated payment discount amount (from the term of payment) is printed. In case an invoice is made for which no term of payment is used then the invoice print will show 0,00. |
| |05|, Amount of Credit surcharge | With this the calculated amount of credit surcharge (from the term of payment) is printed. In case an invoice is made for which no term of payment is used then the invoice print will show 0,00. |
| |06|, Currency customer | With this the currency code of the customer is printed. |
| |07|, VAT Credit surcharge | With this the VAT-amount of the used credit surcharge is printed. In case an invoice is made for which no term of payment is used then the invoice print will show 0,00. |
| |08|, Term of payment | With this the invoice text, entered at the term of payment, is printed. In case an invoice is made for which no term of payment is used then the invoice print will show nothing. |
| |09|, Invoice amount after deduct @4 | With this the amount is calculated that the customer has to pay after the amount of the term of payment is deducted. In case an invoice is made for which no term of payment is used then the invoice print will show 0,00. |
| |10|, Expiry date | With this the expiry date of the invoice is printed. |
| |11|, Payment schedule | If in the terms of payment a schedule for payments is set up, this code can be used to print this schedule on an invoice |
| |12|, IBAN-number | To print the bank account number of the customer. |
 |
The merge fields |01| till |11| can only be used in the footer text of invoices. If these merge fields are used in the header- or email text then the code itself will be printed in the text. |
For the call-up textblock the following codes are available:
| |01|, Deliver date | With this the deliver date of the call-up is printed. |
| |02|, Sales order(s) | With this the sales order numbers which are meant for the call-up, are printed. |
| |03|, Delivery note(s) | With this the delivery notes which are meant for the call-up, are printed. |
| |04|, Purchase order(s) | With this the purchase order numbers of the purchase lines are printed. |
| |05|, Customer number(s) | With this the customer numbers for which the call-ups are meant, are printed. |
| |06|, Collect area(s) | With this the collect area descriptions are printed, based on the delivery note information for which the call-up is meant. |
| |07|, Destination(s) country | With this the country descriptions are printed, based on the delivery addresses of the delivery notes for which the call-up is meant. |
Type 'Text line'
The textblock type 'Text line' is not used in the header or footertext of a document. This type of textblock can be used when filling the external or internal text of for example a sales order. The entered textblocks can be used for frequent extra text like 'with rootball' or 'netted'. These textblocks can only be added to the external and internal texts if the lines are transferred with the help of the order entry window.
 |
Do not start and end this type of textblock with an empty line. |
Type textblocks
With the use of WinTree Basic with Trade functionality (module number 75) the following types of textblocks are available:
| A | General |
| C | Sales orders |
| D | Delivery list |
| E | Delivery note / Picking list |
| F | Invoice |
| J | Catalogue |
| K | Wish list |
| L | Stock list |
| M | Credit note |
| P | Text lines |
The following textblocks are only available if for this an extra module is activated. The needed module number is shown in the last column:
| B | Quotation | 60 |
| G | Reminders | 15 |
| H | Purchase orders | 65 |
| I | Call up | 65 |
| N | Order confirmation | 62 |
| O | Overview accounts | 15 |
| Q | Licence text | 92 |
| R | Enquiry texts | 132 |
| S | Purchase invoices | 102 |
| Transports | 127 |